Search This Site

Custom Search
|
 |
||
Final Preparations For Computer Boot
And What To Do If the Computer Will Not Boot Up?Computer boot up is the first step in starting up your built computer. If the computer will not boot up, if you need computer crash help, or your computer locks up on start up; do not panic. There are basic computer repair at home checks you can do (it's often about forgetting a step in the process). The completed computer... The last thing we need to do before trying a computer boot is to hook up the peripherals. Plug in your keyboard, mouse, and monitor. Refer to the back panel diagram if you need to for the correct motherboard, or other, connections. And don't forget to plug in the power cable to the back of the power supply. Once you have everything in place... Note: When you first boot up your computer, you will either see the motherboard manufacturer's logo screen, or you will see the POST results screen. When you see either of these, press the "Delete" key on your keyboard. If the Delete key does not work, look for something onscreen to the effect of "F2 = Setup". This is the key that will get you into the computer BIOS screens.
Flip the switch on the back of your power supply, and push the power button on the front of your case and we are off and running! Don't forget to press the "Delete" key during the boot process to get into the BIOS... Now - if your computer will not boot up, or it boots up but almost immediately it locks up, or the computer crashes shortly after boot up. Don't panic. We can take care of that. If you run into this, take a browse over to the troubleshooting guide and we'll does some computer repair at home checks to figure out what's wrong. Again - don't panic, even after 12 years, I still have a computer that will not boot every now and then or one that needs computer crash help diagnostics. Ok, your computer booted up, you hit your delete key, and we are looking at the BIOS setup screen. Let's adjust some of the BIOS settings and set a few things up.
BIOS Settings
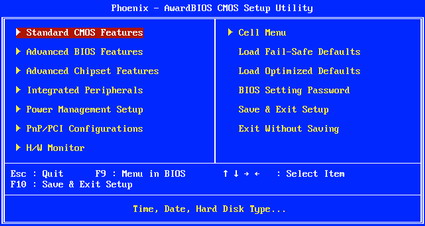
Once in your BIOS, you should see a screen similar to the following:
Within the computer BIOS screens you will use the arrow keys on your keyboard to navigate around. The + and – (plus and minus) keys are used to adjust the settings, the enter key will confirm and save your settings and the ESC key will cancel your change, and take you back one screen. Keep in mind that computer BIOS screens will differ from motherboard to motherboard, but the basic functionality that we will cover here will be pretty much the same. At any time during the process, you can refer to your motherboard manual. Most companies will include instructions for the different setup screens.
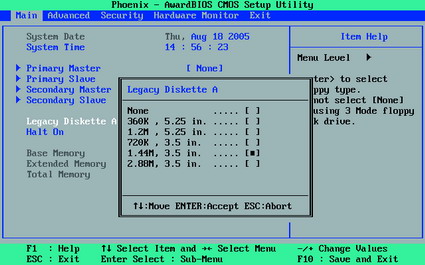
Standard CMOS Features Screen
The Standard CMOS Features BIOS Screen is where you can configure the following...
The main setting here to be concerned with is the Hard Drive. The keyboard and monitor are basically just there for legacy systems, as you either have one, or you don't. The Time and Date settings can be adjusted here, as well as within your Operating System. The Hard Drives however need to be setup here in order for the BIOS to find and access them. Most modern motherboards will allow you to auto detect your hard drive. Simply highlight the IDE or SATA Primary drive and hit the Enter Key. You should see an option to autodetect your drive.
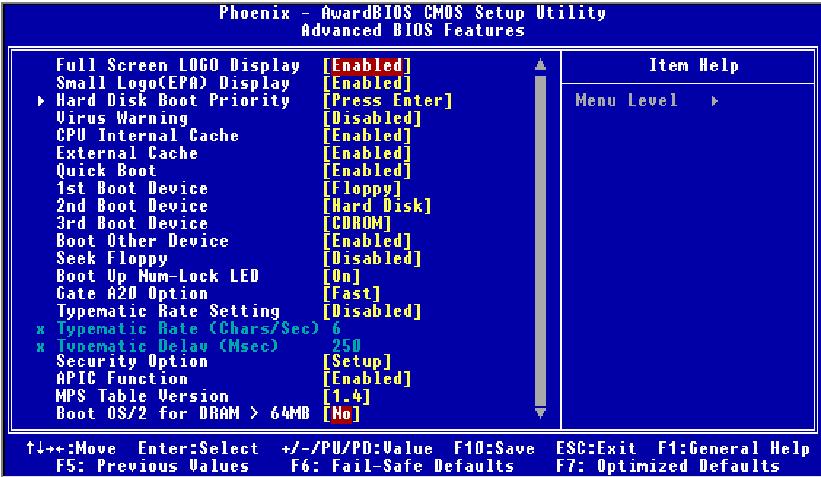
The other thing we'll need to do in the BIOS is to set the boot order. To set the boot order of your computer, first go to Advanced BIOS Features from the main computer BIOS screen, then arrow down to Boot Sequence, and hit Enter. This will bring up a screen that will show you choices you can setup. On some BIOS Screens, you will see the options listed out, as in this picture. Simply select what you want for the First, Second, and Third Boot Device. Most motherboards will come preset with Floppy as the first choice. If you do not have a floppy drive, I would recommend changing this to DVD Drive until you have your operating system installed, after that, you can set it to your primary hard drive.. You can also substitute USB Drive in that slot if you boot from External Drives or Flash Drives. To setup the rest of your BIOS settings now, click here, otherwise, you can return later to do this.
Installing An Operating SystemOnce you are ready, open your DVD drive and put in your Operating System DVD - most likely one of the Windows flavors, XP or Vista. When you have this in place, arrow to "Save and Exit" on your BIOS, say yes to the prompt, and your computer will reboot. This time, let the computer boot all the way through by itself, and it will find the DVD in the drive and begin the OS installation process. Depending on which Operating System you purchased, your setup screens will look a bit different. However, the procedure for each is fairly similar. Keep in mind that these installations can take anywhere from 30 minutes to 2 hours or more. Normally, they take around 1 hour. So make sure to set aside the time - don't interrupt set up and come back later - often that's when something gets missed. We are almost there - after the computer boot you need to focus on Finalizing Your Setup - Install the Drivers.
Return to How To Build A Computer from Computer Boot. Return To Build Your Own Computer Home Page from Computer Boot. |
What's NewThanks for
|
||
|


|
|||
|
| Home Page | Motherboards | CPU | Memory | Computer Drives | Graphics | Power Supply
| Input Devices |
| Output Devices | Cooling | Cases | Modems | Troubleshooting | Computer Guides | Buying Guide | | Free Games | Computer Software | Green Computers | Ultra Mobile PC | Glossary | Builder's Corner | | Site Index | Contact Us | Advertising | Return to top
Copyright© 2008-2014. Voice Marketing Inc. All Rights Reserved. Read our Privacy Policy. |
|||