Search This Site

Custom Search
|
 |
|||
Computer BIOSDell BIOS, IBM BIOS, Phoenix BIOS, AMI BIOS and MoreWhat is BIOS? Computer BIOS stands for basic input/output system; it controls the initial startup of your computer. Take a look at the BIOS screens on this page; learn that a bios virus can shut down your system; and learn how to reset BIOS password. The computer BIOS is a set of firmware code that is run when you first turn on your computer. When a computer first boots, it does not have access to any sort of operating system and cannot access the system memory or hard drives. The hardware in the system cannot by itself load the operating system, so the computer needs something that will initiate the process. The primary function of the computer BIOS is to identify and initiate the components on the motherboard and to prepare the system for boot up. This preparation sets the components up so that the software programs of the operating system can load up and take control of them. This process is known as Bootstrapping. There are 3 main computer BIOS makers. Award BIOS, AMI BIOS, and Phoenix BIOS. Dell BIOS and IBM BIOS are manufactured by third parties. Keep in mind that there really isn't a such thing as an Intel BIOS or Windows BIOS. The BIOS' are created by Award, AMI and Phoenix and are installed on the motherboard. When you turn your computer on, it runs what is called a POST - Power On Self Test. The POST is a set of instructions that will initialize the system. The BIOS will also interact with the CMOS. The CMOS holds user customized data such as passwords, hard drive details, the date, and the time. The general order of device start-up during POST is...
The last thing the POST does is load the boot loader for the Operating System you are using, and pass control to it. You can set the boot order of the drives to allow you to boot from a flash drive, CD/DVD, or hard drive.
Introduction To BIOS Settings
Let me say here that changing certain settings in your setup can cause problems with your computer and can prevent you from booting. Some Motherboards today will come with BIOS Backup onboard so that if something were to go wrong, it can revert back to an older version. In the event that something does go wrong, remember that you can always reset your motherboard to the factory settings. There are two ways that you can reset your computer BIOS. The easiest is to simply remove the battery from the motherboard, wait for about 20 minutes, and put it back in. If removing the battery does not work, you can toggle the motherboard's reset jumper. Refer to your motherboard manual to find out where the jumper is located. Some higher end boards even have a reset button that you can simply press (this is also known as: reset BIOS password). Keep in mind also that you may never need to go into your computer BIOS settings, except when building your own computer (or in the very unfortunate circumstance of a BIOS virus). I'm not trying to scare anyone off here, just want you to make sure you are careful. Let's take a look at the BIOS settings...
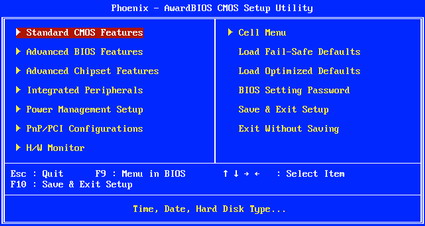
BIOS Settings
When you first boot up your computer, you will either see the motherboard manufacturer's logo screen, or you will see the POST results screen. When you see either of these, press the "Delete" key on your keyboard. If the Delete key does not work, look for something onscreen to the effect of "F2 = Setup". This is the key that will get you into the computer BIOS screens. Once there, you should see a screen similar to the following:
Within the computer BIOS screens you will use the arrow keys on your keyboard to navigate around. The + and – (plus and minus) keys are used to adjust the settings, the enter key will confirm and save your settings and the ESC key will cancel your change, and take you back one screen. Keep in mind that computer BIOS screens will differ from motherboard to motherboard, but the basic functionality that we will cover here will be pretty much the same. At any time during the process, you can refer to your motherboard manual. Most companies will include instructions for the different setup screens.
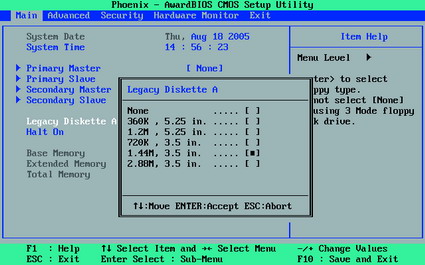
Standard CMOS Features Screen
The Standard CMOS Features BIOS Screen is where you can configure the following...
The main setting here to be concerned with is the Hard Drive. The keyboard and monitor are basically just there for legacy systems, as you either have one, or you don't. The Time and Date settings can be adjusted here, as well as within your Operating System. The Hard Drives however need to be setup here in order for the BIOS to find and access them. Most modern motherboards will allow you to auto detect your hard drive. Simply highlight the IDE or SATA Primary drive and hit the Enter Key. You should see an option to autodetect your drive.
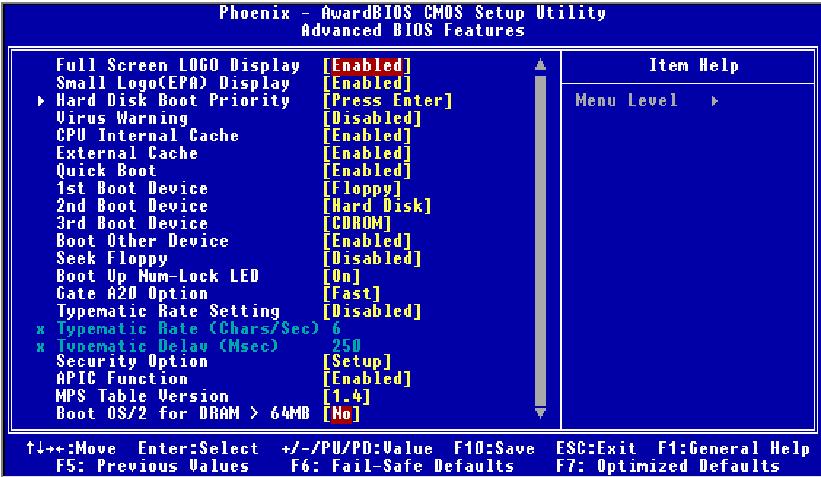
Advanced BIOS Features
To set the boot order of your computer, first go to Advanced BIOS Features from the main computer BIOS screen, then arrow down to Boot Sequence, and hit Enter. This will bring up a screen that will show you choices you can setup. On some BIOS Screens, you will see the options listed out, as in this picture. Simply select what you want for the First, Second, and Third Boot Device. Most motherboards will come preset with Floppy as the first choice. If you do not have a floppy drive, I would recommend changing this to DVD Drive until you have your operating system installed, after that, you can set it to your primary hard drive.. You can also substitute USB Drive in that slot if you boot from External Drives or Flash Drives. If you are using Windows XP Service Pack 2 or Vista, you should enable USB 2.0 support on your motherboard. This will speed up the communications with your USB devices. This setting can be called different things, sometimes it is called OnChip PCI Device, sometimes USB 2.0 Support. Ensure that the OnChip USB Controller is enabled, and that USB 2.0 Controller is also enabled. If you want to see what your computer is actually doing when it boots up, instead of the manufacturer's logo, find the option that says Full Screen Logo Display, and set it to disabled. This way, you will be able to see any errors or issues your computer may have at boot up, as well as monitor the progress of the boot. Look for the Quick POST, or Quick Power On Self Test option. By setting this option to disabled, you can speed up your boot time. What this will do is reduce the number of times the system checks the memory from 3 times, to only once. Select the correct display for video bios. Look for an option that says "Init Display First", or "Primary VGA BIOS", or "PEG Port/Graphic Adapter Priority". If you are using a graphics card in your system, you can set this option to either AGP, or if you have PCI-E, set it to PEG. This will tell the system exactly which card to use, so it doesn't have to waste time searching all options. System BIOS Cacheable and Video BIOS Cacheable options can both be set to disabled. These are settings for older systems using DOS, and are not used in newer systems. It doesn't hurt if they are enabled, but it'll speed things up if you turn them off. By setting the APIC Mode option to Enabled, you can sometimes speed up the communications between the CPU, the Northbridge, and the Southbridge. That's it for the advanced settings. There are many other more advanced settings, but you want to be very careful and do some detailed reading before changing them. Most will not break your computer, but some have the possibility of producing damage to your CPU or motherboard. Most notably, be sure you know exactly what you are doing when changing processor or memory voltages. For more information on the other settings in the BIOS, consult your motherboard manual, or check out the overclocking guides at Tom's Hardware.
Return to Motherboards from Computer BIOS Return To Build Your Own Computer Homepage |
What's New |
|||
|


|
||||
|
| Home Page | Motherboards | CPU | Memory | Computer Drives | Graphics | Power Supply
| Input Devices |
| Output Devices | Cooling | Cases | Modems | Troubleshooting | Computer Guides | Buying Guide | | Free Games | Computer Software | Green Computers | Ultra Mobile PC | Glossary | Builder's Corner | | Site Index | Contact Us | Advertising | Return to top
Copyright© 2008-2014. Voice Marketing Inc. All Rights Reserved. Read our Privacy Policy. |
||||